
Sprue Plate Insulators
| Silver Bullet Pages | |
|---|---|
|
|
|
I mentioned earlier that the key to actually casting silver bullets was a sprue plate insulator, which both helps keep the mold hot, and prevents the molten silver from contacting the cold sprue plate. In case any of our readers are interested in actually casting their own bullets, here's how to manufacture the sprue plate insulators.
Since I knew I was going to be making a number of these, I wrote to the good folks at Mountain Molds and had them build me three extra sprue plates. This allows to make four plates at once, which speeds things up considerably.
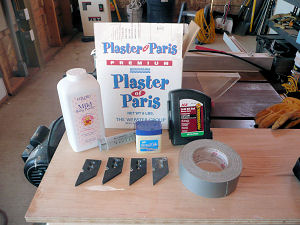
You'll need the following materials to cast sprue plate insulators:
- Plaster of Paris
- Talcum Powder (I used a cheap baby powder. Mmmm -- smells great!)
- Petroleum Jelly
- A drill press, and a selection of bits
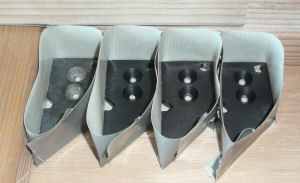
The sprue plate insulators must fit the top of the sprue plate precisely, which is accomplished by casting the refractory plaster on top of the sprue plate. The first step is to wrap the sprue plate with tape (duct tape works well), allowing a small amount of the tape to extend below the sprue plate. The tape is then folded below the sprue plate, creating a form which seals tightly along the perimeter. A second piece of tape is then used to seal the sprue holes and the alignment pin notch. The photo shows all four of my sprue plates after being wrapped in duct tape.
The next step is to use a release agent to prevent the cast material from adhering to the sprue plates. Petroleum jelly works very nicely for plaster casts, so apply a thin coat of jelly evenly over the entire sprue plate. Make sure to coat the pouring wells, but don't goop the jelly in. I often fill the hole for the hinge pin with jelly, which saves a bit of time cleaning it out later.
Now we're ready to pour. Combine the plaster and talc in a 3:1 ratio and add enough water to make a fairly thin plaster (like pancake batter). Add enough plaster to the form to fill it about 3/8" (or about 7mm) deep. The forms should then be shaken to help settle the plaster in the mold. I do the casting on a scrap piece of plywood, which allows me to simply jiggle the plywood to vibrate the forms. At this point you may see numerous small bubbles rise to the surface of the plaster. Let the plaster dry for about thirty minutes before continuing.
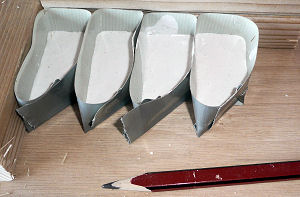
After about thirty minutes the surface of the plaster will be relatively dry to the touch, but it's very green and far from being fully dry. This is the easiest time to work the plaster, but it must be handled gently. Carefully remove the duct tape from the sprue plate, and you should see a nice slab of plaster ready for machining. If the top is really uneven, you may can place a piece of medium grit sandpaper on a flat surface, then rub the cast (plaster side down, obviously) on the sandpaper to produce a flat surface. Sanding is usually not required.
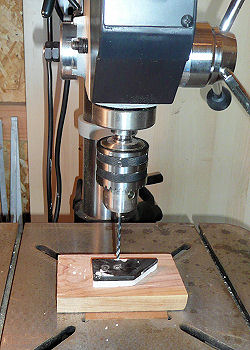
The next step is to drill out the the pour holes, where the molten silver will actually enter the bullet mold. If you turn the blank over, so that the actual sprue plate is on top, these holes will be clearly visible. In a bullet mold, the sprue plate contains tapered pour wells, with a hole in the bottom. The molten material is poured into the wells, and enters the actual mold cavity through the holes in the bottom. When casting, the molten metal is poured in until the cavity overflows and metal fills the well on top of the sprue plate. The sprue plate is hinged at one corner of the mold, and when struck with a mallet the sharp edges of the pour hole cut through the sprue (the bit of metal extending up into the pour well).
You must choose a bit that is very nearly as large as the pour hole. If your bit is too small, the resulting hole will be too small to admit the molten metal quickly. This will result in a poorly formed casting, or the pour freezing in the hole prior to completely filling the mold. If you choose too large a bit, you risk damaging the sharp edges of the sprue plate, which will make it difficult or impossible to shear through the sprue cleanly after casting. For my mold, a 7/32 bit fits perfectly.
Having chosen your bit, use a drill press to drill through the pour holes in the plate and the plaster below them. Since the plaster is still green it takes very little effort, though the plaster may foul the flutes on your drill bit frequently. A quick wipe with a paper towel and you're ready to continue drilling.
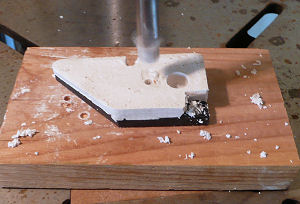
Next, you'll need to drill the plaster away from the alignment pin slot on your sprue plate. Most molds have a pin on top, and the sprue plate will have a corresponding recess. When the mold is closed, ready to pour, the pin keeps the sprue plate aligned with the pour holes directly over the mold cavities. You'll want to make sure your insulator doesn't interfere with this operation, so drill out the plaster around the alignment pin slot. I sometimes mill this out with the same bit I used to drill the pour holes, and sometimes switch to a larger bit that more nearly matches the size of the slot. Either way works fine.

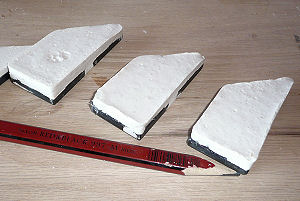
Now for the toughest part -- clearing away the material over the hinge pin. The sprue plate is mounted to the mold with a bolt in one corner, allowing it to pivot. That bolt sticks up above the sprue plate, so we need to make sure our insulator clears it without interference. I use a box knife to carefully whittle away the plaster over the hinge pin. If you try to remove too much material you risk having the entire plate fracture, rendering it useless. After some trial and error, I usually find it pays to slow down and take my time with this step. In the photo above you can the plates with the holes bored, the alignment pin slot machined free of plaster, and the hinge pin cut free of plaster.
The original sprue plate had pouring wells machined into it -- you know, the place where you dump the molten metal. We've managed to completely fill those with plaster, so now the top of the insulator just has these tiny pour holes we bored. It would be very hard to fill the mold that way, so we need to create some larger wells. Choose a drill bit that matches as closely as possible the profile of the wells in your sprue plate. I found a 7/16 bit that's close to perfect for my mold. Set the depth stop on your drill press so that the tip of the drill bit will be nearly to the bottom of the sprue plate, then carefully drill your pour wells. Center the bit over the pour holes you drilled earlier. In the photo above you can see I've completed one well cavity, and I'm lining up over the second hole.
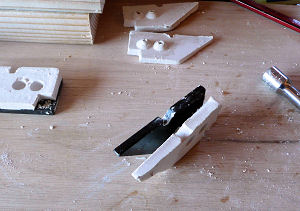
The final step is to gently separate the insulator from the sprue plate. If you got a good coat of petroleum jelly on the sprue plate this shouldn't present a problem. I usually tap the sprue plate with a small mallet a couple of times. Quite often, this is sufficient to cause the plaster to fall away cleanly. If not, I use a box knife to gently separate the insulator from the sprue plate. The photo shows a plate being separated, and above you can clearly see the pour wells cast into the bottoms of additional insulators. Congratulations, you're done!
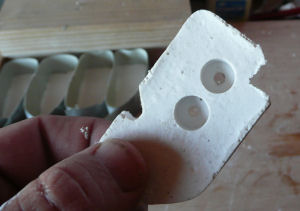
This is another view of the completed insulator. The insulators need to be completely dry before casting, so I generally bake them for several hours in my kitchen oven at 450° F (232F), or take them to the lab and cook them for an hour or so at 840° F (450° C). As they dry, they plates change from a creamy white to a very light grey, making it fairly easy to see which plates are ready to cast with. Happy casting!
Next: Sizing and Lubrication